savageagle
HamRadio/Office of Emergency Services/Fire-EMT-SAR
Pedal Power! How to Build a Bike Generator
(information below taken from the popular mechanics website)
I'm a cycling enthusiast, and when the weather is bad I use a bicycle trainer in my
apartment. But riding to nowhere has always felt pointless. This got me thinking about how
I could use my pedaling to produce electricity. By driving a generator with the movement
of the back wheel, I figured I could run a lamp or charge my phone. Realistically, this
wouldn't do much to cut my utility bills (or carbon emissions), but it would give my indoor
riding a sense of purpose. Besides, I was curious to see what the project involved.
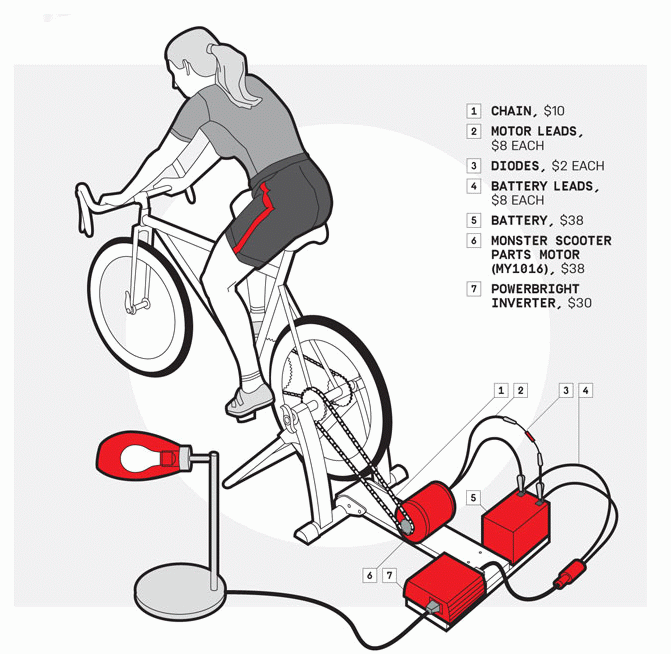
To skip ahead a bit, I ended up rigging my bike to a 24-volt, 200-watt electric motor, which I
modified slightly to generate electricity instead of doing mechanical work. I used the motor
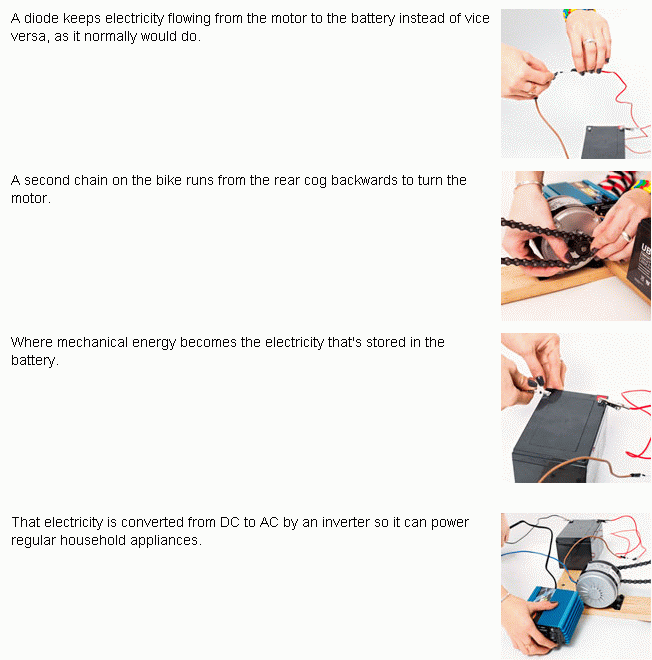
(now, operationally, a generator) to charge a 12-volt lead–acid battery. And, finally, I added
an inverter to convert the battery's DC current into an AC current, which is what's needed to
power anything you'd normally plug into a wall outlet, and to store power so you can use
appliances even when not pedaling.
Pedal to Metal
I found a lot of the build details on Instructables, the online project-sharing community,
where user saullopez52 had done basically what I had in mind. While interning at an
educational startup in L.A., Saul Lopez developed the idea as a way to bring environmental
technology projects to schools. He thought it would be a low-cost, fun way to provide
students with engineering experience. "The exercise component was what made the project
engaging," he says. Plus, he adds, "I like that the project has a lot of room for
customization."
That's what I did—I customized. I found a combination single-speed/fixed-gear bike that
worked well, thanks to its ability to hold a cog on either side of the back wheel. The chain
on the right is driven by the pedals, while an added chain on the left spins the motor. On the
side that's driven by the pedals, I used a freewheel, which rotates the wheel when I'm
pedaling but allows it to keep spinning forward, without the chain moving, when I'm
coasting or pedaling backward. On the left side of the wheel, I attached a fixed cog, which
spins in the direction of the chain as long as the wheel is turning.
To keep the bike steady I dedicated a bicycle trainer to the project. A nice thing about
commercial trainers is that you can easily detach the bike if you want to go out for a ride.
But you can also build your own stand; you just need a setup that allows the rear axle to
spin freely while raising the back wheel slightly off the ground. To get the bike stand ready
for generating power, I removed the resistance unit, which is the spinnable metal cylinder
that rubs against the wheel to mimic the feeling of riding on pavement. (Once you attach the
motor, you'll also feel resistance as you generate a current, but it really doesn't take much
effort.)
With the resistance unit gone, there was space to attach a wooden board extending from the
rear of the bike, to hold the motor, battery, and inverter. Because I was using a narrow board
(a 2 x 4), I needed to add a crossbar to hold the electrical equipment. (Note: Before attaching
anything, you should measure how far the chain extends from the back of the bike. Position
the motor so a chain from the left side of the rear hub runs parallel to the wheel, straight
back to the motor. With a V-belt, you have to measure precisely; with a chain, you can add
and remove links with a chain tool.)
With the motor screwed into the center of the crossbar, I positioned the battery and inverter
on either side as counterweights for each other. That helped keep the bar parallel to the
ground. I secured them with industrial-strength Velcro, which would hold up when I was
moving the contraption around but allow me to fiddle with the parts.
Before linking up any of the electrical components, I tested the connection between the bike
and the motor to make sure pedaling actually spun the motor shaft. The shaft of the motor I
used is slightly grooved, and the chain gripped well. If you find yourself with a motor that
refuses to spin, you can connect a cog to the shaft, guaranteeing that the chain will have a
good grip.
Going Electric
A motor is designed to spin rather than to be spun. So, when connected to a charged battery,
it will want to draw power from the battery to turn the bike wheel. To prevent electricity
from flowing the wrong way, I inserted a diode between the motor and the battery. A diode
directs a current in only one direction, from the anode to the cathode; in my circuit, the
anode faced the positive terminal of the motor, while the cathode faced the battery's
positive terminal. I wrapped the ends of the diode around the motor's exposed wire and an
alligator-clip-tipped test lead, which fastens to the battery, and insulated the connections
with electrical tape. Then I wired the motor's negative lead directly to the negative terminal
of the battery.
Ideally, the battery should be kept charged above 50 percent, but to prevent corroding it,
don't continue to give it electricity after it's fully charged. To keep an eye on this I hooked
up a multimeter to the battery terminals. Be careful to set the multimeter to the correct
measurement—12 volts in the DC range (though, if that's not available, choose the next
number higher than 12). I overlooked the setting on my first ride and the multimeter went
up in smoke.
I also used a multimeter to monitor how hard I needed to pedal. To charge the battery I
wanted the generator to put out 13 to 14.5 volts. By keeping my eye on the multimeter as I
rode, I was able to get a good feel for this. (In retrospect, it would have been worth it to buy
a voltage regulator so I could pedal as hard as I wanted without feeding too much voltage
into the battery.)
The final step was to connect the leads from the inverter to the battery. When choosing an
inverter, make sure it can handle the maximum peak load you're anticipating. (Loads are
measured in watts, which is a unit of power.) Since I wasn't planning to do anything more
strenuous than run a 100-watt lamp, I bought an inverter rated for just 200 watts.
When it was all assembled, I pedaled my bike and the current flowed. Even better, if I had a
few batteries on hand whose charge I monitored monthly, I could store up enough energy to
power small electronics during a power outage. And, yes, the generator did make indoor
bike riding fun. After a while, however, the rig made my apartment feel pretty cramped,
especially since I already had two other bikes. Luckily, it caught the eye of a neighbor who
had some extra space and who was happy to take the contraption. And now when I want to
charge my phone while exercising, I know just where to go.
(from savageagle)
There are questions I'm sure like how to identify the anode and cathode of a diode. you may have to do a bit of your own research which isn't that hard. These devices can be calculated to be small or large depending on what your needs are. They are simple to make aside from the extra information you may have to get. I have made a very simple one to use with my local ham club that charged a single battery that ran a mobile radio for contesting in where by craeting your own power and operating a radio and contacting others gets you points for doing so as a stand alone self contained unit.
Do some searching before you decide to make one because there are many different choices in the hardware you may use which will make a big difference in how much you'll spend in making your
pedal powered generator.
(information below taken from the popular mechanics website)
I'm a cycling enthusiast, and when the weather is bad I use a bicycle trainer in my
apartment. But riding to nowhere has always felt pointless. This got me thinking about how
I could use my pedaling to produce electricity. By driving a generator with the movement
of the back wheel, I figured I could run a lamp or charge my phone. Realistically, this
wouldn't do much to cut my utility bills (or carbon emissions), but it would give my indoor
riding a sense of purpose. Besides, I was curious to see what the project involved.
To skip ahead a bit, I ended up rigging my bike to a 24-volt, 200-watt electric motor, which I
modified slightly to generate electricity instead of doing mechanical work. I used the motor
(now, operationally, a generator) to charge a 12-volt lead–acid battery. And, finally, I added
an inverter to convert the battery's DC current into an AC current, which is what's needed to
power anything you'd normally plug into a wall outlet, and to store power so you can use
appliances even when not pedaling.
Pedal to Metal
I found a lot of the build details on Instructables, the online project-sharing community,
where user saullopez52 had done basically what I had in mind. While interning at an
educational startup in L.A., Saul Lopez developed the idea as a way to bring environmental
technology projects to schools. He thought it would be a low-cost, fun way to provide
students with engineering experience. "The exercise component was what made the project
engaging," he says. Plus, he adds, "I like that the project has a lot of room for
customization."
That's what I did—I customized. I found a combination single-speed/fixed-gear bike that
worked well, thanks to its ability to hold a cog on either side of the back wheel. The chain
on the right is driven by the pedals, while an added chain on the left spins the motor. On the
side that's driven by the pedals, I used a freewheel, which rotates the wheel when I'm
pedaling but allows it to keep spinning forward, without the chain moving, when I'm
coasting or pedaling backward. On the left side of the wheel, I attached a fixed cog, which
spins in the direction of the chain as long as the wheel is turning.
To keep the bike steady I dedicated a bicycle trainer to the project. A nice thing about
commercial trainers is that you can easily detach the bike if you want to go out for a ride.
But you can also build your own stand; you just need a setup that allows the rear axle to
spin freely while raising the back wheel slightly off the ground. To get the bike stand ready
for generating power, I removed the resistance unit, which is the spinnable metal cylinder
that rubs against the wheel to mimic the feeling of riding on pavement. (Once you attach the
motor, you'll also feel resistance as you generate a current, but it really doesn't take much
effort.)
With the resistance unit gone, there was space to attach a wooden board extending from the
rear of the bike, to hold the motor, battery, and inverter. Because I was using a narrow board
(a 2 x 4), I needed to add a crossbar to hold the electrical equipment. (Note: Before attaching
anything, you should measure how far the chain extends from the back of the bike. Position
the motor so a chain from the left side of the rear hub runs parallel to the wheel, straight
back to the motor. With a V-belt, you have to measure precisely; with a chain, you can add
and remove links with a chain tool.)
With the motor screwed into the center of the crossbar, I positioned the battery and inverter
on either side as counterweights for each other. That helped keep the bar parallel to the
ground. I secured them with industrial-strength Velcro, which would hold up when I was
moving the contraption around but allow me to fiddle with the parts.
Before linking up any of the electrical components, I tested the connection between the bike
and the motor to make sure pedaling actually spun the motor shaft. The shaft of the motor I
used is slightly grooved, and the chain gripped well. If you find yourself with a motor that
refuses to spin, you can connect a cog to the shaft, guaranteeing that the chain will have a
good grip.
Going Electric
A motor is designed to spin rather than to be spun. So, when connected to a charged battery,
it will want to draw power from the battery to turn the bike wheel. To prevent electricity
from flowing the wrong way, I inserted a diode between the motor and the battery. A diode
directs a current in only one direction, from the anode to the cathode; in my circuit, the
anode faced the positive terminal of the motor, while the cathode faced the battery's
positive terminal. I wrapped the ends of the diode around the motor's exposed wire and an
alligator-clip-tipped test lead, which fastens to the battery, and insulated the connections
with electrical tape. Then I wired the motor's negative lead directly to the negative terminal
of the battery.
Ideally, the battery should be kept charged above 50 percent, but to prevent corroding it,
don't continue to give it electricity after it's fully charged. To keep an eye on this I hooked
up a multimeter to the battery terminals. Be careful to set the multimeter to the correct
measurement—12 volts in the DC range (though, if that's not available, choose the next
number higher than 12). I overlooked the setting on my first ride and the multimeter went
up in smoke.
I also used a multimeter to monitor how hard I needed to pedal. To charge the battery I
wanted the generator to put out 13 to 14.5 volts. By keeping my eye on the multimeter as I
rode, I was able to get a good feel for this. (In retrospect, it would have been worth it to buy
a voltage regulator so I could pedal as hard as I wanted without feeding too much voltage
into the battery.)
The final step was to connect the leads from the inverter to the battery. When choosing an
inverter, make sure it can handle the maximum peak load you're anticipating. (Loads are
measured in watts, which is a unit of power.) Since I wasn't planning to do anything more
strenuous than run a 100-watt lamp, I bought an inverter rated for just 200 watts.
When it was all assembled, I pedaled my bike and the current flowed. Even better, if I had a
few batteries on hand whose charge I monitored monthly, I could store up enough energy to
power small electronics during a power outage. And, yes, the generator did make indoor
bike riding fun. After a while, however, the rig made my apartment feel pretty cramped,
especially since I already had two other bikes. Luckily, it caught the eye of a neighbor who
had some extra space and who was happy to take the contraption. And now when I want to
charge my phone while exercising, I know just where to go.
(from savageagle)
There are questions I'm sure like how to identify the anode and cathode of a diode. you may have to do a bit of your own research which isn't that hard. These devices can be calculated to be small or large depending on what your needs are. They are simple to make aside from the extra information you may have to get. I have made a very simple one to use with my local ham club that charged a single battery that ran a mobile radio for contesting in where by craeting your own power and operating a radio and contacting others gets you points for doing so as a stand alone self contained unit.
Do some searching before you decide to make one because there are many different choices in the hardware you may use which will make a big difference in how much you'll spend in making your
pedal powered generator.